Live chat Settings
1. Introduction
Floatchat Live Chat allows you to set up live chat for your bots. You can add multiple bots and set up different configurations for these bots.
2. Onboarding
Owner can click on ‘Configure Live Chat’ button from the Home page, to get started with Live Chat.
As you switch to the live chat portal, you have to complete a few steps in Live Chat wizard.This workflow is available only to the Owner of the account.

2.1 General Settings
These are the general configurations to be added for the bot


The details required are Request Feedback on Resolution, Agent Busy Response, Transfer to Agent Response, Exit Conversation Max. Wait time for mobile and web (channels available by default),Holiday dates.The owner or the supervisor can add or edit these at later point in time.
Custom notification text for agent joining/leaving conversation
To customize the notification message for when an Agent joins or leaves a conversation, you can enable the “Show event log history” button.

This is how it appears on the chat screen:

2.2 Setup SLA
You can Setup Working hours and SLAs while onboarding. These can also be edited later, by going to Configure, Team and Setup by Supervisor or Owner.

2.3 Add Categories
You can also add different categories for different agent groups for e.g. Support, Billing etc. The category “default” is available as a default for all Messages. The owner can add team members and assign channels and categories as required, and the same can also be changed as needed.

After adding all the details, the owner will be able to review all sections once. If required, the owner can edit the details added and then click on Save to complete the bot setup.
Owner can click on ‘Configure Live Chat’ button from the Home page, to get started with Live Chat.
As you switch to the live chat portal, you have to complete a few steps in Live Chat wizard.This workflow is available only to the Owner of the account.
2.1 General Settings
These are the general configurations to be added for the bot
The details required are Request Feedback on Resolution, Agent Busy Response, Transfer to Agent Response, Exit Conversation Max. Wait time for mobile and web (channels available by default),Holiday dates.The owner or the supervisor can add or edit these at later point in time.
2.2 Setup SLA
You can Setup Working hours and SLAs while onboarding. These can also be edited later, by going to Configure, Team.
2.3 Add Categories
You can also add different categories for different agent groups for e.g. Support, Billing etc. The category “default” is available as a default for all Messages. The owner can add team members and assign channels and categories as required, and the same can also be changed.After adding all the details, the owner will be able to review all sections once. If required, the owner can edit the details added and then click on Save to complete the bot setup
3 Live Chat- Core
i) Request Feedback on Resolution: On enabling this option, the end user will be asked for feedback whenever the agent marks the chat resolved. ii) Agent Busy Response: This message will be the response shown to the user if live chat is triggered and the agents are busy. The text here can be modified by the supervisor. The message added here by default would be “All our agents are busy. Try again later” iii) Transfer to Agent Response: This message will be sent as a message by the bot when live chat is triggered.The message added here by default would be “An agent will attend to you shortly”iv) Wait Time: Supervisor can set the maximum wait time for the user in the queue. Max. wait time is applicable only for Web and Mobile SDK channels. After the expiration of the wait time, the user will be navigated to the agent unavailable flow. v) An email can always be sent upon resolution.


3.1 Team
a) Setup


Work Week: The owner/supervisor can select the working days of the week. By default Mon- Fri will be set as the working days.
Work Hours: The owner/supervisor can set working hours of the day. The timezone for the working hours would be the same as the one set in General Settings.
Holidays: If there are other holidays except for the weekends, the owner/supervisor can add those dates here.
Max. conversations per agent: The owner/supervisor can set the maximum number of active conversations the agent can handle at a time. The number of conversations can be set differently for different channels.
SLA for Response: First response SLAs can be set according to the channels. The SLA violation counts will be visible on the dashboard.
SLA for Resolution: The supervisor can set SLA for resolution of queries coming in. The SLA violation counts will be visible on the dashboard.
b) Team
The Owner/ Supervisor can see the list of agents and supervisors added for the product. The supervisor can add multiple agents and supervisors for the product.

To add an agent/supervisor/role, click on the “Add team member” button.
Choose a Role and fill the details like, name, Email, Channels etc.
When you Invite a member, An invitation email will be sent to the newly added user, who will need to accept to join the team.
If an existing supervisor is added for the product, the supervisor will be visible in the list for the product and will have shared access.
After adding an agent or a supervisor, you can change the assigned channels and categories.

Managing Team Members
Inviting Team Members
Click on the Add Team Member to invite the user onto the platform.

Note: An existing account on the Floatchat Platform is not allowed, inviting users from the Add team member creates an account with the email provided, and the user is mapped to the product for which the invitation had been sent.
Resetting the Password link
This option allows you to share a link with the user via which they can reset the passwords of their Floatchat Accounts, the links are valid only for 15 minutes.
Deleting Team Members
The delete admin icon enables you to remove a Team member from your product.
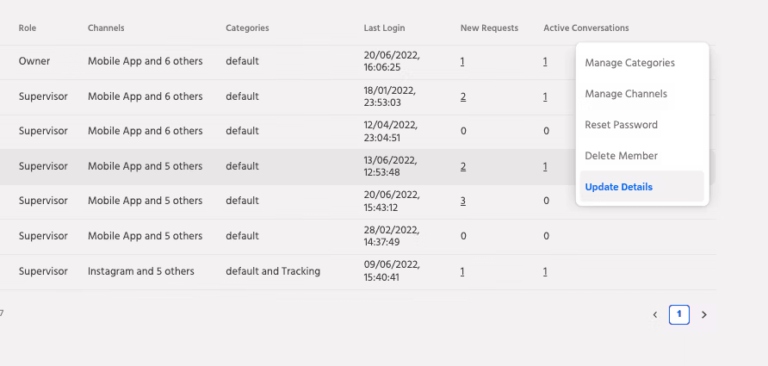
Update details – For updating the role of a team member.

Refresh Button is an add-on to ensure we get the updated Resources.
Quick Responses section allows the supervisor to add ‘Quick Replies’ that the agents can use while responding to a user.
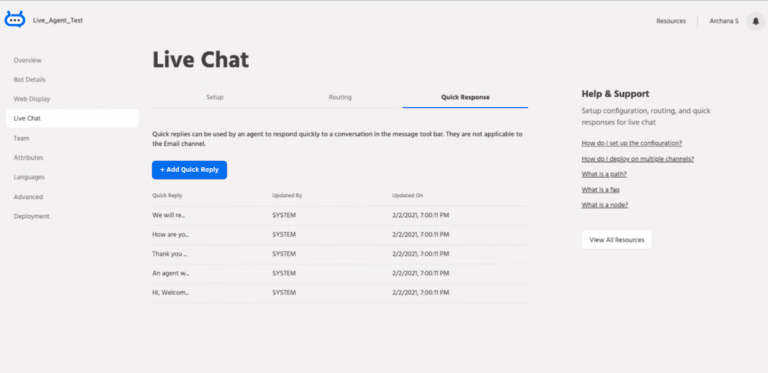
The owner/supervisor can add, edit and delete quick replies. The ones present by default cannot be edited or deleted.
Updated by represents who has added those quick replies, System are default ones created by the system itself by default, you can click on the pencil icon to edit them or the delete bin to delete them.
3.2 Routing
The supervisor can set contextual routing i.e based on the attributes set by the user. The supervisor can define rules for assigning chats to a particular category by adding rule sets.
a) Add Rule Set
To add a rule set, click on the Add Rule Set button and enter the name for the rule set.

To specify the conditions for the rule, click on the arrow on the extreme right for the added rule set to expand.
The attributes can be Username, City, Country, Email ID, Phone Number, Title, Primary Language, Channel, Conversation Status, Conversation Start Date,Conversation Due by and many more.
Rules can be created based on multiple conditions and specify the Rule expression using AND/OR operators. Maximum eight conditions can be added per rule set. The supervisor can add, edit and delete the conditions for a rule set.
Both system defined and custom attributes would be available for the same.
The supervisor can check the box below for assigning the conversation to the same agent who managed the conversation for that user. If the agent is unavailable, then the routing would be done according to the agent available in that category.
Contextual routing overrides the category set in the flow set in the Automate section.
Currently, a maximum of three rule sets can be added per product. The supervisor can edit and delete the rule set.
3.3 Know the Roles
This role is assigned to the account creator. Owner has complete access to the portal features and services. Owner can invite a user for any role and can delete any invited user.
- An owner can not modify his own role.
- There is only one owner per account.
3.1) Owner
This role is assigned to the account creator. Owner has complete access to the portal features and services. Owner can invite a user for any role and can delete any invited user.
- An owner can not modify his own role.
- There is only one owner per account.
3.2) Supervisor
A Supervisor has access to all the features enabled for the account except the accounts tab. Supervisor can only monitor and control the products they have been invited to.
Additionally, Supervisors can manage and supervise the live chat functionality, from chat assignment to team management, everything can be accomplished by them.
- Supervisor can not modify the account’s plan or check any account information. He can be invited by an owner and can invite other supervisors, bot builders, and agents.
- Supervisors get the privilege to delete and modify the roles and names of other users, except for the owner.
- You can assign the channels and the categories for which the Owner, Supervisor, and Agent should get the live chat requests. If a live chat request has been triggered for a category that does not have any agents or supervisors mapped to it, then the chat will be routed to the unassigned tab of the Owner and Supervisor.
3.3) Executive
An Executive role allows you to access the accounts page along with dashboard, deploy, train and users.
- Though the executive gets access to the train, it is only limited to observation.
- The permission to create new bot, Invite new user or delete/modify an account is not given to an executive.
- Executive can modify your plan and deploy the bot he has been invited for.
3.4) Bot Builder
Bot builder role is assigned to purely build and test bots. Bot builder gets to access bot building and deployment tools i.e Build, Configure, Deploy, Train, Broadcast, and Integration.
- Account management and engagement tracking and analysis are not the jobs of a bot builder hence we have discarded this from the set of rules.
- Bot builder is not provided access to Accounts, Dashboard, Users and Live chat.
- Bot builder can not add a new bot, but can only work on the bot assigned to him.
3.5) Agent
Agent role is assigned to handle all live chat requests on the system. An agent can only access live chat and Preferences, and doesn’t have access to any other functionality of the portal. The agent can be assigned a category to segregate the requests to the relevant agencies.
- Live chat request assignment is done based on the availability of the agent, which is determined by the status of the toggle button. (Online/offline)
Once the setting is done, user can choose which step to perform after the basic setup. You can Build conversational flow, Setup FAQ, Test the bot or Deploy the bot. User will then be taken to the selected workflow.
i) Request Feedback on Resolution: On enabling this option, the end user will be asked for feedback whenever the agent marks the chat resolved. ii) Agent Busy Response: This message will be the response shown to the user if live chat is triggered and the agents are busy. The text here can be modified by the supervisor. The message added here by default would be “All our agents are busy. Try again later” iii) Transfer to Agent Response: This message will be sent as a message by the bot when live chat is triggered.The message added here by default would be “An agent will attend to you shortly”iv) Wait Time: Supervisor can set the maximum wait time for the user in the queue. Max. wait time is applicable only for Web and Mobile SDK channels. After the expiration of the wait time, the user will be navigated to the agent unavailable flow. v) An email can always be sent upon revolution.
3.1 Team
Work Week: The owner/supervisor can select the working days of the week. By default Mon- Fri will be set as the working days.
Work Hours: The owner/supervisor can set working hours of the day. The timezone for the working hours would be the same as the one set in General Settings.
Holidays: If there are other holidays except for the weekends, the owner/supervisor can add those dates here.
Max. conversations per agent: The owner/supervisor can set the maximum number of active conversations the agent can handle at a time. The number of conversations can be set differently for different channels.
SLA for Response: First response SLAs can be set according to the channels. The SLA violation counts will be visible on the dashboard.
SLA for Resolution: The supervisor can set SLA for resolution of queries coming in. The SLA violation counts will be visible on the dashboard.
b) Team
The Owner/ Supervisor can see the list of agents and supervisors added for the product. The supervisor can add multiple agents and supervisors for the product.
To add an agent/supervisor/role, click on the “Add team member” button.
Choose a Role and fill the details like, name, Email, Channels etc.
When you Invite a member, An invitation email will be sent to the newly added user, who will need to accept to join the team.
If an existing supervisor is added for the product, the supervisor will be visible in the list for the product and will have shared access.
After adding an agent or a supervisor, you can change the assigned channels and categories.
Managing Team Members
Inviting Team Members
Click on the Add Team Member to invite the user onto the platform.
Note: An existing account on the Floatchat Platform is not allowed, inviting users from the Add team member creates an account with the email provided, and the user is mapped to the product for which the invitation had been sent.
Resetting the Password link
This option allows you to share a link with the user via which they can reset the passwords of their Floatchat Accounts, the links are valid only for 15 minutes.
Deleting Team Members
The delete admin icon enables you to remove a Team member from your product.
Refresh Button is an add-on to ensure we get the updated Resources.
Quick Responses section allows the supervisor to add ‘Quick Replies’ that the agents can use while responding to a user.
The owner/supervisor can add, edit and delete quick replies. The ones present by default cannot be edited or deleted.
Updated by represents who has added those quick replies, System are default ones created by the system itself by default, you can click on the pencil icon to edit them or the delete bin to delete them.
3.2 Routing
The supervisor can set contextual routing i.e based on the attributes set by the user. The supervisor can define rules for assigning chats to a particular category by adding rule sets.
a) Add Rule Set
To add a rule set, click on the Add Rule Set button and enter the name for the rule set
To specify the conditions for the rule, click on the arrow on the extreme right for the added rule set to expand.
The attributes can be Username, City, Country, Email ID, Phone Number, Title, Primary Language, Channel, Conversation Status, Conversation Start Date,Conversation Due by and many more.
Rules can be created based on multiple conditions and specify the Rule expression using AND/OR operators. Maximum eight conditions can be added per rule set. The supervisor can add, edit and delete the conditions for a rule set.
Both system defined and custom attributes would be available for the same.
The supervisor can check the box below for assigning the conversation to the same agent who managed the conversation for that user. If the agent is unavailable, then the routing would be done according to the agent available in that category.
Contextual routing overrides the category set in the flow set in the Automate section.
Currently, a maximum of three rule sets can be added per product. The supervisor can edit and delete the rule set.
3.3 Know the Roles
There are five main roles in Floatchat platform.
3.1) Owner
This role is assigned to the account creator. Owner has complete access to the portal features and services. Owner can invite a user for any role and can delete any invited user.
- An owner can not modify his own role.
- There is only one owner per account.
3.2) Supervisor
A Supervisor has access to all the features enabled for the account except the accounts tab. Supervisor can only monitor and control the products they have been invited to.
Additionally, Supervisors can manage and supervise the live chat functionality, from chat assignment to team management, everything can be accomplished by them.
- Supervisor can not modify the account’s plan or check any account information. He can be invited by an owner and can invite other supervisors, bot builders, and agents.
- Supervisors get the privilege to delete and modify the roles and names of other users, except for the owner.
- You can assign the channels and the categories for which the Owner, Supervisor, and Agent should get the live chat requests. If a live chat request has been triggered for a category that does not have any agents or supervisors mapped to it, then the chat will be routed to the unassigned tab of the Owner and Supervisor.
3.3) Executive
An Executive role allows you to access the accounts page along with dashboard, deploy, train and users.
- Though the executive gets access to the train, it is only limited to observation.
- The permission to create new bot, Invite new user or delete/modify an account is not given to an executive.
- Executive can modify your plan and deploy the bot he has been invited for.
3.4) Bot Builder
Bot builder role is assigned to purely build and test bots. Bot builder gets to access bot building and deployment tools i.e Build, Configure, Deploy, Train, Broadcast, and Integration.
- Account management and engagement tracking and analysis are not the jobs of a bot builder hence we have discarded this from the set of rules.
- Bot builder is not provided access to Accounts, Dashboard, Users and Live chat.
- Bot builder can not add a new bot, but can only work on the bot assigned to him.
3.5) Agent
Agent role is assigned to handle all live chat requests on the system. An agent can only access live chat and Preferences, and doesn’t have access to any other functionality of the portal. The agent can be assigned a category to segregate the requests to the relevant agencies.
- Live chat request assignment is done based on the availability of the agent, which is determined by the status of the toggle button. (Online/offline)
Once the setting is done, user can choose which step to perform after the basic setup. You can Build conversational flow, Setup FAQ, Test the bot or Deploy the bot. User will then be taken to the selected workflow.
What's New?
Release Notes
Release Notes February 2023
Release Notes January 2023
Release Notes December 2022
Release Notes November 2022
Release Notes October 2022
Release Notes September 2022
Release Notes August 2022
Release Notes July 2022
Release Notes June 2022
Release Notes January 2023
Release Notes December 2022
Release Notes November 2022
Release Notes October 2022
Release Notes September 2022
Release Notes August 2022
Release Notes July 2022
Release Notes June 2022