Enabling voice bots
1. Introduction
Voice is increasingly seen as the future of user interactions. An increasing number of devices and software applications are becoming voice ready and it is imperative that voice is kept in mind while designing the chatbot interactions with end-users.
Flaotchat includes several flavours of voice recognition to enable voice-driven interactions. These include using voice-over Web, Mobile Widgets as well as on channels like Whatsapp. Voice support can also be extended beyond these traditional channels & interfaces to use cases like IVRs.
2. Availability
There are two key flavours of Voice Support in Floatchat
- Voice to Text on Web Widget: Available as part of Floatchat Business Plan
- Voice Conversations – Available on request as part of Flaotchat Enterprise Plan. This also includes support for handling Voice Notes on Whatsapp
3. Setup – Voice to Text (Web Widget)
This option is available as part of Floatchat Business Plan and is supported on Web Chatbot Widget on Chrome. To enable it, navigate to Configure -> Web Display -> Settings and enable the checkboxes.

Enabling this would allow the end-users to see an option to enable audio input mode on the website widget. In this mode, the chatbot listens to the user’s commands and responds back normally in text.
4. Setup – Voice Interactions
Floatchat enables end-2-end Voice Interactions and Whatsapp Voice Notes handling by enabling Integration with Google Voice. To Integrate, you would first need to generate your google service account credentials as a JSON file.
As a prerequisite, you need to have a google app configured in your google console account.
Visit https://console.cloud.google.com/ and click on “Select a project”, and add details to it.

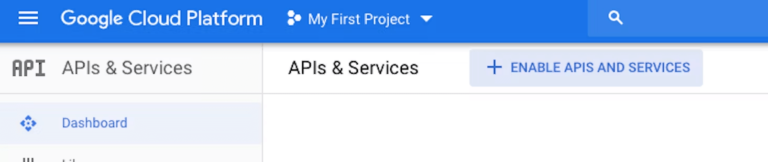
Now from the Navigation Menu select “APIs & Services” and select “Enable APIs & Services”.
Search for “ Cloud Speech to Text API ” as well as ” Cloud Text to Speech API ” and enter your payment details to get it enabled.
Navigate to IAM & Admin tab in the left panel. Open the IAM & Admin page in the GCP Console. Select your project and click Continue. In the left nav, click Service accounts. Select the option to Create a Service Account.

You can provide a name of your choice for the service account and continue.
In the next step of associating a role – Select “Organization Administrator”.
In the next step, you will have the option to grant users access. This part can be skipped.
In the section below that, there will be an option to generate the Key –

You can then upload the credentials JSON file in Floatchat under Configure > Deploy > Voice

4.1. Voice conversation for multilingual Bots
Floatchat chatbots can also respond in multiple languages, to use this functionality you must have ”Localization service” enabled in your chatbot.
Please follow this document to know more about Multilingual capability.
Once this option has been enabled, when the user selects the Arabic language option and asks a question in Arabic the bot would respond to the user in Arabic similarly if the user had selected the German language and would ask the user in German the bot would respond in the same.
Note: The languages supported in the Floatchat chatbot platform for voice conversation are dependent on the fact that these languages must be supported by Google too.
Floatchat enables end-2-end Voice Interactions and Whatsapp Voice Notes handling by enabling Integration with Google Voice. To Integrate, you would first need to generate your google service account credentials as a JSON file.
Floatchat enables end-2-end Voice Interactions and Whatsapp Voice Notes handling by enabling Integration with Google Voice. To Integrate, you would first need to generate your google service account credentials as a JSON file.
As a prerequisite, you need to have a google app configured in your google console account.
Visit https://console.cloud.google.com/ and click on “Select a project”, and add details to it.
Now from the Navigation Menu select “APIs & Services” and select “Enable APIs & Services”.
Search for “ Cloud Speech to Text API ” as well as ” Cloud Text to Speech API ” and enter your payment details to get it enabled.
Navigate to IAM & Admin tab in the left panel. Open the IAM & Admin page in the GCP Console. Select your project and click Continue. In the left nav, click Service accounts. Select the option to Create a Service Account.
You can provide a name of your choice for the service account and continue.
In the next step of associating a role – Select “Organization Administrator”.
In the next step, you will have the option to grant users access. This part can be skipped.
In the section below that, there will be an option to generate the Key –
You can then upload the credentials JSON file in Floatchat under Configure > Deploy > Voice
4.1. Voice conversation for multilingual Bots.
Floatchat chatbots can also respond in multiple languages, to use this functionality you must have ”Localization service” enabled in your chatbot.
Please follow this document to know more about Multilingual capability.
Once this option has been enabled, when the user selects the Arabic language option and asks a question in Arabic the bot would respond to the user in Arabic similarly if the user had selected the German language and would ask the user in German the bot would respond in the same.
Note: The languages supported in the Floatcha chatbot platform for voice conversation are dependent on the fact that these languages must be supported by Google too.
5. Configuration – Voice Conversation on Web
Once Voice Integration is completed, Configuration for enabling Voice on Web Widget can be completed from the Deploy Section.
Supported Configurations include
- Enable Voice Input: Allow users to give input by speaking instead of typing the message. This is supported only for the web widget usage on Chrome.
- Enable Voice Conversation: This option is available after Google Voice Integration, explained earlier is completed. On enabling this option, Floatchat would use your configured Google Account for Voice to Text and Text to Voice conversions
- Enable Continuous Voice Mode: This allows users to have complete voice conversation including speaking to the bot and listening to the bot respond back in voice.
- Voice Response Gender: The bot will respond to the selected gender’s voice.
- Phrase Hints: This would allow you to enter 10 custom keywords or phrases that need to be recognized by the voice engine. This would typically help you to enter your domain-specific keywords or your brand/product names.
End-User Experience on the Web Widget for the Chatbot
- On the first launch of the bot for a user, the browser may pop up a permission dialog box to allow the use of a microphone. Allowing Microphone access is mandatory.
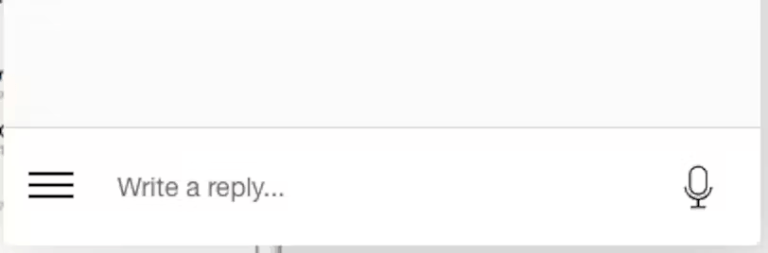
- When Voice input is enabled, the bot user will see a mic icon at the bottom right corner of the chat window
- To start Voice conversations, this mic icon needs to be clicked
- Once Voice mode starts, the bot gives the user the option to Speak before processing the collected voice input and responding back in the configured voice

Floatchat enables end-2-end Voice Interactions and Whatsapp Voice Notes handling by enabling Integration with Google Voice. To Integrate, you would first need to generate your google service account credentials as a JSON file.
Floatchat enables end-2-end Voice Interactions and Whatsapp Voice Notes handling by enabling Integration with Google Voice. To Integrate, you would first need to generate your google service account credentials as a JSON file.
As a prerequisite, you need to have a google app configured in your google console account.
Visit https://console.cloud.google.com/ and click on “Select a project”, and add details to it.
Now from the Navigation Menu select “APIs & Services” and select “Enable APIs & Services”.
Search for “ Cloud Speech to Text API ” as well as ” Cloud Text to Speech API ” and enter your payment details to get it enabled.
Navigate to IAM & Admin tab in the left panel. Open the IAM & Admin page in the GCP Console. Select your project and click Continue. In the left nav, click Service accounts. Select the option to Create a Service Account.
You can provide a name of your choice for the service account and continue.
In the next step of associating a role – Select “Organization Administrator”.
In the next step, you will have the option to grant users access. This part can be skipped.
In the section below that, there will be an option to generate the Key –
You can then upload the credentials JSON file in Floatchat under Configure > Deploy > Voice
4.1. Voice conversation for multilingual Bots.
Floatchat chatbots can also respond in multiple languages, to use this functionality you must have ”Localization service” enabled in your chatbot.
Please follow this document to know more about Multilingual capability.
Once this option has been enabled, when the user selects the Arabic language option and asks a question in Arabic the bot would respond to the user in Arabic similarly if the user had selected the German language and would ask the user in German the bot would respond in the same.
Note: The languages supported in the Floatchat chatbot platform for voice conversation are dependent on the fact that these languages must be supported by Google too.
5. Configuration – Voice Conversation on Web
Once Voice Integration is completed, Configuration for enabling Voice on Web Widget can be completed from the Deploy Section.
Supported Configurations include
- Enable Voice Input: Allow users to give input by speaking instead of typing the message. This is supported only for the web widget usage on Chrome
- Enable Voice Conversation: This option is available after Google Voice Integration, explained earlier is completed. On enabling this option, Floatchat would use your configured Google Account for Voice to Text and Text to Voice conversions
- Enable Continuous Voice Mode: This allows users to have complete voice conversation including speaking to the bot and listening to the bot respond back in voice.
- Voice Response Gender: The bot will respond to the selected gender’s voice.
- Phrase Hints: This would allow you to enter 10 custom keywords or phrases that need to be recognized by the voice engine. This would typically help you to enter your domain-specific keywords or your brand/product names.
End-User Experience on the Web Widget for the Chatbot
- On the first launch of the bot for a user, the browser may pop up a permission dialog box to allow the use of a microphone. Allowing Microphone access is mandatory.
- When Voice input is enabled, the bot user will see a mic icon at the bottom right corner of the chat window
- To start Voice conversations, this mic icon needs to be clicked
- Once Voice mode starts, the bot gives the user the option to Speak before processing the collected voice input and responding back in the configured voice
6. Configuration – Voice Conversation on Whatsapp
Once Voice Integration is completed, Configuration for Whatsapp can be completed from the Deploy Section. Option to enable Voice for Whatsapp becomes available after Google Voice Integration Setup has been completed in Configure > Voice as explained above.
Enabling Voice Input for Whatsapp, allows Floatchat to start handling Voice Notes, added by the user to the Whatsapp Bot. The voice note, received over Whatsapp, is translated to text using your Google Voice Account. Once converted, Floatchat responds back, normally using text, via the Chatbot using the NLP training completed for the chatbot.